


David Richardson is an NCI Curriculum Developer & Instructor
Air filters create resistance to airflow that can reduce a fan’s ability to move air by up to 50%. You can evaluate the filter’s impact on airflow by measuring the pressure drop over it. It takes less than a minute to do. It is often the diagnostic test that identifies the problem in nearly one third of residential systems.
Air handlers with internally-mounted filter racks are challenging when you want to measure filter pressure drop. Because manufacturers typically mount the filter directly against the indoor coil, there is little room to conduct pressure measurements after the filter.
To deal with this configuration, technicians often resort to testing variations that could lead to inaccurate measurements. The most common of these variations involves measuring pressure with the air filter installed and then removed. Let’s look at how most technicians perform this test, why it is incorrect, and what additional accessories you’ll need to measure it correctly.
The Wrong Way to Test Filter Pressure Drop
Typically, a technician using this incorrect test method first measures static pressure after the internal coil in the air handler, with the filter installed. They take this reading between the coil and the inlet to the blower. The technicans then take a second static pressure measurement in the same location with the filter removed. The two readings are then subtracted from each other to determine filter pressure drop.
So here’s an example: Pressure is measured after the coil of the air handler with the filter installed and found to be .40” w.c. (inches of water column). The filter is removed, and a second pressure measurement is taken. The new pressure with the filter removed is .52” w.c. This therefore results in a calculated filter pressure drop of .12” w.c. (.52 – .40 = .12).
Why It’s Incorrect
This test may sound good on the surface, but the result will be an inaccurate filter pressure drop. This is because removing the filter decreases total external static pressure (TESP), so the match to find the filter pressure drop doesn’t calculate. Remember this rule: as static pressure decreases, fan airflow increases.
Once you place the filter back into the air handler, the fan must overcome the added resistance of the filter. TESP increases and fan airflow decreases. The readings are not taken under similar conditions – fan airflow has changed. Failing to recognize this interaction could lead you to chase a filter problem that doesn’t exist.
The Correct Way to Measure Filter Pressure Drop
In order to avoid the scenario above, you need to test the system under normal operating conditions – not simulated ones. Also, to keep from altering system conditions, you’ll need to obtain a pressure reading after the filter – a feat many technicians claim is impossible on this installation. However, if you have the right static pressure probe, the reading is simple to obtain.
Did you know you can make your own probe? Use an 18” piece of 1/4-inch soft copper tubing — the type you would use to hook up a humidifier or ice-maker. If you’ll email me a request, I would be glad to send you the instructions on how to make one. With the 18” straight static pressure probe, you can get in between the filter and the coil with no problem.
So after making the probe, you’ll need to install two test ports for measuring pressures. The following steps are for filter pressure drop on an air handler with an internal filter rack only.
Seven Steps for Success
- Install a 3/8” test port into the return duct on the entering air side of the equipment (return plenum). This is your pressure measurement before the filter, as air enters the air handler.
- Remove the filter door from the air handler and install a 3/8” test port near the top of the filter door. Measure with a tape measure to assure the port allows your probe to go between the filter and coil. Note: It’s best to avoid drilling into the filter door while it’s on the air handler — you don’t want to damage a drain pan.
- Re-install the filter door onto the air handler. The port on the filter door provides access for your pressure measurement after the filter, just before air enters the coil.
- Turn on the system and assure the fan is operating at its highest speed.
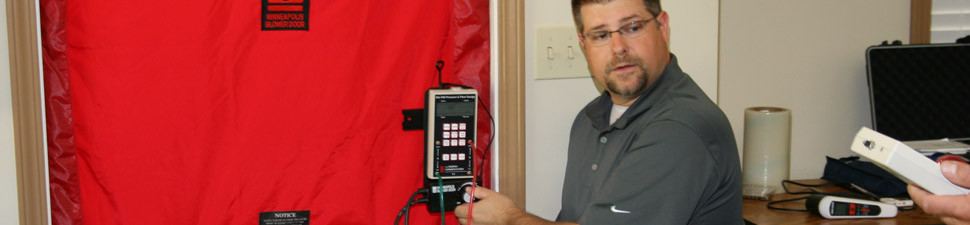
- Turn on your digital manometer, or if using an analog manometer, level and zero it.
- Attach a hose to the (-) port of the manometer or (low) port of the Magnehelic and insert the straight static pressure probe into the opposite end of the hose.
- Insert the straight static pressure probe into the 3/8” test port you installed before the filter and record the reading.
- Insert the straight static pressure probe into the 3/8” test port you installed in the filter door, after the filter, and record the reading.
- Subtract the two pressures to determine filter pressure drop.
Diagnosing Filter Pressure Drop Readings
In a perfect world, filter pressure drop should typically not exceed 20% of the fan’s maximum rated TESP. You can find this rating on the air handling equipment’s data plate often located on the blower door.
Let’s say you’re testing filter pressure drop on an air handler that’s maximum rated TESP is .30” w.c. Multiply the maximum rated TESP by 20% or .20 to come up with the ideal filter pressure drop. In this example, filter pressure drop should not exceed .06” w.c. (.30 x 20% = .06).
If filter pressure drop exceeds 20% of the maximum rated TESP, you’ll need to use a less restrictive filter type or move and upsize the filter surface area to an external location for it to work properly.
David Richardson serves the HVAC industry as a curriculum developer and trainer at National Comfort Institute, Inc. (NCI). NCI specializes in training that focuses on improving, measuring, and verifying HVAC and Building Performance.
If you’re an HVAC contractor or technician interested in learning more about static pressure and air filters, contact David at davidr@ncihvac.com or call him at 800-633-7058. NCI’s website www.nationalcomfortinstitute.com is full of free technical articles and downloads to help you improve your professionalism and strengthen your company.
Leave a Reply
You must be logged in to post a comment.